Garden visiting

If you can’t understand your garden  then visit one. Wake up and smell the roses and enjoy the beauty of nature on an urban scale. It’s easy and fun here in Ireland.Garden lovers adore looking at other people’s creations; it’s a chance to admire, snipe, envy and imitate. Visiting is the great garden voyeur’s chance: wander around the a lovely private gardens, chat with the owner, sit and have tea , they do the clean up.

Mornington Garden would like to welcome you, and especially if you are a group of 3 or more. I am here most of the time pottering (?) so why not come as I really enjoy the beauty that nature has allowed me to have here in this corner of Dalkey.

I also hold workshops , Growing herbs and vegetables in containers, Art in the garden, Lear how to photograph your garden, and more.

Dalkey-Garden-School-Gardening-Border Dalkey-Garden-School-Hedge

Summer Containers

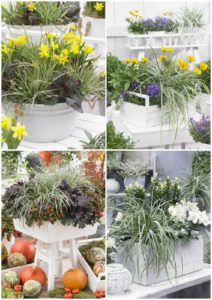
1.  Proper plant selection. Select the right plants for the container and growing conditions.

2.  Selecting the right container.  Further increase your success by selecting a container large enough to accommodate your plants.

3.  Potting mix.  Next, invest in a quality potting mix that holds moisture yet provides adequate drainage.

4.  Watering.

5.  Feeding.

I suppose these are the 5 starting points to get you going. With this in mind we will on Saturday May 5 I am  looking  forward to putting to gather a selection of plants, which will bring you joy for the coming summer.

Plant names

Binomial name  Prunus X yedoensis

A hybrid cherry of unknown origin, probably between Prunus speciosa as father plant and Prunus pendula as mother.It occurs as a natural hybrid in Japan and is now one of the most popular and widely planted cultivated flowering cherries in temperate climates worldwide. 


Intergeneric hybrids 

× Cuprocyparis leylandii

Leyland cypress

Family
Cupressaceae

Genus
× Cuprocyparis are large, very fast-growing evergreen trees of narrowly conical or columnar habit, with tiny scale-like leaves in dense sprays, and small spherical cones.Is now a very unpopular tree, as it is not very easy kept in control, and when pruned will not regenerate well.

Chimera  ( 2 plants  –  one tree)

+Laburnocytisus adamii   The plus sign (+) indicates its unusual origin. The plant can also be described by the formula Laburnum anagyroides + Chamaecytisus purpureus.

A small tree which is a graft-chimaera between two species, a laburnum, Laburnum anagyroides, and a broom, Chamaecytisus purpureus ( Cytisus purpureus), which bears some shoots typical of the one species, some of the other, and some which are a peculiar mixture of both “parents”. This binomial name is written as if it were one species, but strictly speaking it is not one species but two.

How to sow seeds

Growing your own fruits, veggies, and flowers from seeds is way less intimidating.

If you are  like many gardeners, you have never tried growing your own plants from seed. Or, if you have tried, maybe your seedlings didn’t resemble those you see at the garden centre each spring, and you’re wondering how you can do better.

Rest assured, starting your own seedlings is fun, easy, and well worthwhile. By growing your own transplants, you can choose from hundreds of unusual varieties—including those with tolerance to heat or cold, disease resistance, and unmatched flavour—that simply aren’t available at garden centres. Plus, you’ll have the satisfaction of knowing that you’ve grown your entire garden organically right from the very start.

Choose A Fine Medium

For healthy seedlings, you’ve got to give them a loose, well-drained medium (seed-starting mix) composed of very fine particles. You can buy a seed-starting mix at your local garden centre. Don’t use potting soil—often, it’s too rich and doesn’t drain well enough for seedlings. Living Green Donegal compost  is excellent for all of this.

I have it here in Dalkey Garden School for sale.

Assemble Your Containers

Many gardeners start their seeds in leftover plastic “six packs” from the garden centre, empty milk cartons, or Styrofoam cups. If you don’t have containers on hand, you can buy plastic “cell packs,” individual plastic pots, or sphagnum peat pots. Or make your own pots from newspaper or egg cartons. Whatever you use, be sure your containers drain well (usually through holes in the bottoms of the containers).

Set the pots inside a tray so that you can water your seedlings from the bottom (by adding water to the tray) rather than disturbing them by watering from the top. You can buy seed-starting trays at garden centres.

Plant Your Seeds

Moisten your seed-starting mix before you plant your seeds. If you water after you plant the seeds, they can easily float to the edges of the container—not where you want them to be. To moisten the mix, simply pour some into a bucket, add warm water, and stir. After about 8 hours (or when the mix has absorbed the water), fill your containers with the moistened mix. Cold compost can be a bit of a shock and slow germination (waking seed).

Plant at least two, but no more than three, seeds per container (this is to allow for the presence of a sterile seed).

The seed packet usually tells you how deep to plant, but a good rule of thumb is three times as deep as the seeds’ smallest diameter. (Some flower seeds require light to sprout—if that’s the case, simply lay the seeds on the surface of the mix, then tamp them in gently with your finger.)

After you’ve planted your seeds, cover the tray loosely with plastic to create a humid environment. At 20° to 25°C, your seeds should sprout just fine without  any supplementary heat. If the room temperature is cooler than that, you can keep the seeds warm by setting the tray on top of a heating mat made specifically for starting seeds, a Propagator or on a warm window sill.  Cover seed trays creating a micro environment. Wipe off excess moisture, and check your trays daily. As soon as you see your seeds  sprouting, remove the plastic covers and immediately pop the trays beneath lights.

You can invest in grow lights (which provide both “warm” and “cool” light), but many gardeners have good results with standard 1m. fluorescent shop lights. Set your seedlings as close to the light as possible—100mm  away is about right. When seedlings don’t get enough light, they grow long, weak stems. As the seedlings grow, raise the lights to maintain the proper distance.

And don’t worry about turning off the lights at night. Contrary to popular belief, seedlings don’t require a period of darkness. Fluorescent lights are only one-tenth as bright as sunlight, so your seedlings will actually grow better if you  leave them on continuously, and not a s leggy. If this happens pinch out the growing tip and this will also help to bush out the seedling helping it become a stronger plant, with a tighter root structure.

Feed And Water

Your seedlings will need a steady supply of water, but the soil shouldn’t be constantly wet. The best method is to keep the containers inside a tray, water from the bottom, and allow the soil inside the containers to “wick up” the water.

If you’re growing medium contains only vermiculite and peat (as many seed-starting mixes do), you’ll also need to feed your seedlings, using Living Green really helps here because of the worm casts in the peat. When the seedlings get their first “true” leaves (not the tiny ones that first appear, but the two that follow), mix up a very weak  fish emulsion solution (details later) or a weak multipurpose liquid feed add it to the seedlings’ water every other week. As the plants grow bigger, gradually increase the strength of the mixture or else “pot on” once the roots are filling the container, either or into the ground.

Tomato, courgette, and pumpkin seeds should push their sprouts through the surface of the mix in a few days. Peppers sprout in about a week. And some seeds, such as parsley, can take as long as 3 weeks to sprout—so be patient! Parsley could be pre-soaked to help speed up the process.

NB  Remember to Label!!! Name of seed / date. Make sure you use a permanent marker. It is scary how quickly we forget what we plant and also date as  some seedlings can take some time to germinate and we can then be nicely surprised!

            You have now completed Step No 1 – well done!

DLR Chamber Envirocom Awards 2016

DLR Chamber, Envirocom 2016 Awards, held at the Royal Marine Hotle, Dun Laoghaire, Co.Dublin. November 2016

DLR Chamber, Envirocom 2016 Awards, held at the Royal Marine Hotel, Dun Laoghaire, Co.Dublin. November 2016

Micro-Enterprise awarded to Dalkey Garden School by Cllr Cormac Devlin, Minister of Jobs, Enterprise and Innovation Mary Mitchell O’Connor, President of the Dun Laoghaire Rathdown Chamber  President Pat Neill. Annmarie through her teaching of sound horticultural practices, encouraging her students to ” Leave behind hand prints, not foot prints.” Positive action will help to heal the environment. Small groups, small steps lead to great things. It is this philosophy which drives Dalkey Garden School forward.

Chart Bulb Depth

How to Plant Spring Bulbs


Chart Bulb Depth

When in contact with flower bulbs wear gloves as they can irritate skin.

What you’ll need:

  • Bulbs
  • Containers
  • Potting Soil
  • Water

Step 1

When growing bulbs in a pot, pick a container that is the right size and will complement your chosen bulbs. Anything that has drainage holes and is deep enough to accommodate a few inches of soil and the bulbs works as a container. You’ll need to allow a 1-inch space between the tip of the bulb and the rim of the pot, where you can top dress with 6mm.gravel/pebble.

Step 2

If you are using a clay pot with a large drainage hole in the base, cover it with a piece of broken pot. This prevents the soil blocking the drainage hole.

Step 3

Add  layer of gravel to help with drainage and then 75 mm of potting mix/compost to the container, and firm it gently. Place a bulb on the soil, and twist it a quarter-turn to give it some grip in the soil. Add the rest of the bulbs, spacing them no more than 10 mm apart, don’t let the bulbs touch.

Step 4

Add more potting mix around the bulbs, firming it into place with your fingers. The tips of the bulbs should barely show through the soil surface.

Step 5

Water well until some moisture leaks from the drainage holes. If channels or holes develop in the potting mix, fill them with moistened potting mix.

Step 6

Water after planting.

Label pot.

Aftercare

  • Bulbs in pots need more care than those in soil.
  • Keep the compost moist and protect from frost by wrapping with bubble wrap over winter. Cover with a piece of chicken wire to prevent squirrels, mice and voles from digging them out. Remove it when shoots appear.
  • Check pots regularly. During the chilling phase, the bulbs are growing roots so it’s important that the potting mix not dry out. Check regularly for moisture by sticking your finger into the potting mix. If it feels dry an inch deep, fill the pot to the rim with water, and allow it to drain. Be careful not to overwater. Excess moisture can lead to rot. Check that the pots are draining.
  • Watch for emerging top growth. After six to eight weeks of chilling, green shoots should begin to emerge. At this point you could add a slow release fertiliser to help bulk up the bulb for next year. If you live in a mild climate, this should coincide with the emergence of bulbs in outdoor beds. If you live in a cold-winter region, keep the containers in their cool place until you wish to encourage growth. Keep an eye out for slugs; remove them to compost bin and let them work there! We do need them.
  • Place containers where they will receive light. Temperatures over 20 C push bulbs to grow too quickly, resulting in floppy, leggy top growth. A location in light shade should provide the right balance of light and moderate temperatures. To ensure that your bulbs stand erect, you can support top growth with flower rings or stakes and twine.
  • If you want to save these bulbs, water regularly after the blossoms fade. The leaves will eventually start to turn yellow and dry up. When the leaves have completely turned dry and brown, empty the pot onto your compost pile. Retrieve the bulbs and allow the soil that clings to them to dry. Remove dead foliage, brush off dry soil, and store the bulbs in a cool, dry place. In the autumn, plant these bulbs – except tulips, which don’t re-bloom very well — plant into a garden bed and purchase new bulbs to pot up in containers.

Difference between Snowdrops and Snow flakes

What’s the difference between a snowdrop and a snowflake?

www.burtown House

www.burtown House

Snowdrops, have two distinct whorls of corolla segments (“petals”), arranged so that the three outer segments are large and usually unmarked, while the three inner segments are smaller and form a tube in the centre of the flower. They usually bear green markings at their tips and sometimes at the base as well. Snowflakes, members of the genus Leucojum, have six corolla segments(petals) of equal length, each tipped with green or yellowish-green. Their leaves are also usually glossy bright green, and the plants look much bigger than a snowdrop. The spring snowflake is Leucojum vernum, and the summer snowflake, or London lily, is L. aestivum.

Compost Bin

Garden Composting

How-to-build-the-ultimate-compost-bin/
Known as Black Gold, the essential ingredient to help sustain a healthy environment in your Garden.

Compost Bin

Compost bin

It is important to return to the soil, as much as possible, what you have removed. The soil is composed of millions of insects, micro organisms and fungi, all with their own jobs. Breaking down, organic matter, recycling nutrients, creating channels for both air and water.

Bulky organic matter, in the form of compost and manure forms structure which acts like a sponge retaining large amounts of water, helping especially in drought situations. Soil heat is retained longer as it acts like an insulating blanket.

Home compost is made from all organic non-cooked waste. Never add meat or any cooked food as it will attractive wild life to your heap (rats). It is a combination of 2/3 green (vegetative) and 1/3 brown (twigs, shredded paper — carbon, saw dust, wood chip).

In an ideal situation do not add weeds, especially with seeds. These can be composted separately in double black plastic sealed bags and left for approx. 2 years to insure all traces of original make up has ceased. Personally, I feel we will always have weeds and add everything except certain weeds which are particularly difficult to deal with e.g., Convolvulus roots (bind weed).

A really well working compost heap will create heat, thus killing weed seeds sometimes actually going on fire!!